lab06 : Python skill builder (functions, types, if/else, strings, recursion)
| num | ready? | description | assigned | due |
|---|---|---|---|---|
| lab06 | true | Python skill builder (functions, types, if/else, strings, recursion) | Mon 08/15 08:45AM | Fri 08/19 03:45PM |
If you find typos or problems with the lab instructions, please report them on Piazza
What you’ll do in this lab
This lab is intended to be an opportunity to review, reinforce, and build your confidence with basic programming skills.
Before we move into more advanced labs and projects, we want to give you an opportunity to be sure that your understanding of the following is solid.
- Simple python functions
- Working with if/else
- Working with types in Python
- Python Strings
- Loops
- Recursion
So, we’ve set up a series of files that contain stubs for various Python functions, along with tests for those functions.
Your job is very simple: see if you replace each of the stubs with code that passes the tests that go along with that file.
When you are finished, you can submit your solution to Gradescope for automatic “grading”. (Keep in mind that in SPIS, all so-called “grades” are just a way to get feedback on how you are doing. They don’t “count” on your permanent record in any way. Treat them as “practice” grades.)
Overview
The basic structure of the lab is similar to lab02, except for the one-time steps from that lab, and the fact that the repo you create will begin with some starter code (so that step will look a little different than before.)
After creating the repo, you’ll git clone ... the repo, and then start editing Python code, trying to get
test cases to pass.
Each time you get one more test case to pass, or each time you need to take a break from coding, be sure to do the
git add file.py ; git commit -m "AB/CD message"; git push origin master steps.
The instructions below will give you some additional hints about each of the functions that you’ll be writing, including hints, references to help articles on the website, and/or suggestions of relevant passages in the text.
When all done, and all test cases are passing, you’ll download your project as a .zip file and submit to
Gradescope for automatic checking of all your test cases.
Ok, let’s get started!
Step-by-Step Instructions
Step 1: Create your repository.
The way that you create the repo will be a little different, since we have “starter code” available for you.
Instead of creating the repo from scratch, you’ll set up the repo with Method 1, importing the starter code from this link: https://github.com/ucsd-cse-spis-2016/lab06-startercode.git
The name of your repo should be spis16-lab06-Name1-Name2 where the Name1-Name2 part matches the Pair Name column of the Pairs table from the SPIS FOCS Website
Step 2: Invite the “other” pair partner as a collaborator with admin access
The pair partner that created the repo needs to invite the second pair partner to be a collaborator on the repo with Admin access. That process is explained here: Github: Adding Collaborators
Step 3: cd into the ~/github directory of your
You should have created a ~/github directory during a previous lab.
So use cd ~/github to cd into this directory. If it works, skip down to the next step.
What if that directory doesn’t exist yet?
It is possible, if you are working in the other pairs ACMS account, that they don’t have one yet.
The fastest way to create that directory and cd into is to simply type these commands.
$ mkdir -p ~/github
$ cd ~/github
Two notes on this:
-
Here the
$is standing in for the bash shell prompt, which on ACMS machines is typically something long such as[spis16t3@ieng6-240]:~:179$. Since the exact content of the bash shell prompt differs from system to system, or even user to user, it is traditional to just show it as$in documentation. (By the way, you can customize your shell prompt, but that’s a story for another time.) -
The
-paftermkdirstands for path.
When you usemkdir -p pathinstead of justmkdir pathyou get two benefits:- If the path you are creating, e.g.
~/githubalready exists,mkdir -pdoesn’t complain - You can create a long path all at once,
e.g.
mkdir -p ~/foo/bar/fum/fiddlewill create that entire chain of directories with one command. Without the-p, you can only create one directory at a time, so it would have to bemkdir ~/foo, then ``mkdir ~/foo/bar, thenmkdir ~/foo/bar/fum`, etc.
- If the path you are creating, e.g.
Step 4: Use git clone repos-clone-ssh-url to clone your repo
Use the command git clone repos-clone-ssh-url to clone your new repo.
If you’ve forgetting where to get the repos-clone-ssh-url, consult the page: [git: cloning your first repo]/topics/git_cloning_your_first_repo/)
Step 5: cd into your repo’s directory, and open idle
If you type cd ~/github/spis16-lab06 and then press
the *tab* button, the bash shell should auto-complete the name of your
repo (i.e. automatically finish the -Name1-Name2` part. You can then
press enter and be in the correct directory.
Use the commands pwd, ls, and git status to be sure you are in
the right spot.
Then, open idle by typing idle & at the bash command prompt. The
extra & at the end allows you to get your command prompt back so
that you can use it to type git commands. You may see messages from
time to time from IDLE—if so, just press enter to get a bash
prompt back again.
If you forget the &, no worries. You can also just open a second
terminal window for typing your git commands.
Step 6: Python coding.
In this step you will work, one file at a time, trying to replace the function stubs in each file with running code.
The process consists of:
- choosing a Python file to work on, e.g
pyfuncs01.py - running its tests e.g.
test_pyfuncs01.py - seeing the tests fail
- then replacing the stubs in
pyfuncs01.pywith correct code so that the tests pass - doing the git workflow to commit your changes, e.g. for
pyfuncs01.py:git statusgit add pyfuncs01.pygit statusgit commit -m "AT/CL tests passing for pyfuncs01.pygit statusgit push origin mastergit status
You’ll repeat this process for each of the files pyfuncs01.py, pyfuncs02.py, etc.
- As a reminder, the
CL/ATis used to indicate that you were working as a pair, with:CL(Chris La Jolla) driving (driver’s initials first)AT(Alex Triton) navigating (navigator’s initials second).- Of course, you should use your own pair’s initials, not
CL/AT
- When you have all the tests passing,
do one more commit with the commit message"CL/AT all tests passing".
For each, there some additional hints below.
pyfuncs01.py: Simple Python functions
In pyfuncs01.py, we have two simple python functions that just return a value based on their parameters.
Load the file pyfuncs01.py and the file test_pyfuncs01.py into IDLE.
You’ll need to edit and save changes to both of these files, but its the
file test_pyfuncs01.py that you need to run to see if the test cases pass.
Here, you are just calculating a result by using the arithmetic operators (such as +,-,*,/,**,% etc.) and returning it.
You are also asked to add a few test cases for one of the functions
in test_pyfuncs01.py.
pyfuncs02.py: Checking types
For this step, you should open the files pyfuncs02.py, and
test_pyfuncs02.py.
(This pattern repeats itself for each of the remaining files
pyfuncs03.py, pyfuncs04.py, and pyfuncs05.py—each one has a
test file starting with test_` that goes along with it. So we won’t
repeat those instructions for each step below.)
These functions return True or False based on whether their parameter is of a certain type.
You can read more about types in Python here: Python: types
You are given one example of a function that checks for type, and you are asked to write another one.
You are also asked to write some test cases for a function. Note that if you don’t write those test cases, your
test_pyfuncs02.py may appear to pass even when you haven’t yet replaced the stub for one of the functions
you are supposed to write.
pyfuncs03.py: boolean functions involving or
In this file, you are given a corret function definition for
isAdditivePrimaryColor as an example. There is a comment that invites
you to try a different way of writing the function: one that many students
sometimes think will work, but that doesn’t. You are encouraged to read
the comment, and experiment with that function a bit to convince yourself
that the “alternative” way of writing it doesn’t work, and to try to understand
why.
Then you are asked to write a correct implementation of the function
isSimpleNumeric. You can use the function isAdditivePrimaryColor as
an example. You may also want to consult the functions from pyfuncs02.py
as a reminder of how to check for types.
As a reminder, run test_pyfuncs03.py to test the functions in this
file. You actually can run these tests from the Unix command line too,
by typing python test_pyfuncs03.py—you don’t actually have to open
up test_pyfuncs03.py in IDLE, since you don’t have to make any changes to
it.
pyfuncs04.py: first, rest, last, allButLast functions for lists and tuples
These functions are based on the idea of indexing into lists and tuples with
notations such as [0], [1:], and so forth.
You may want to review the sections of Chapter 5 of your book as well as the notes from lecture about this topic. You are given two function definitions as examples, and then asked to replace the stubs for two more.
pyfuncs05.py: Recursion on lists and tuples
The final set of functions uses the first and rest functions to
do some calculations on lists, via recursion. This is a nice opportunity to
check your understanding of recursion, and practice more with the idea.
Try to understand how the totalValue function works to add up all the number
in a list or tuple of numeric values. Then see if you can apply those ideas to write similar definition for productOfAll, using recursion in a similar fashion.
Next, you are asked to write two simple functions: isOdd and isEven.
Those don’t involve recursion or lists; but the isOdd function is used
as a helper function in two more functions in pyfuncs05.py that do
involve recursion.
Once you’ve written those and gotten the test cases to pass,
try to understand how the countOdds function works.
Then see if you can apply those ideas to write
sumOdds, using a similar recursive technique.
If you got all those tests to pass, you are pretty much done. Just a few steps to finish up and submit.
Step 7: Final check of all your tests
As one last check, run all of your tests in IDLE, or at the command line.
Here is an example of running each one of your tests at the command line. Here the bash shell prompt is replaced by simply $ to make the output easier to read. If your output looks like this, it means all of your tests are passing, and you
are ready to try submitting on Gradescope.
$ python test_pyfuncs01.py
......
----------------------------------------------------------------------
Ran 6 tests in 0.000s

OK
$ python test_pyfuncs02.py
..........
----------------------------------------------------------------------
Ran 10 tests in 0.000s

OK
$ python test_pyfuncs03.py
........
----------------------------------------------------------------------
Ran 8 tests in 0.000s

OK
$ python test_pyfuncs04.py
....................
----------------------------------------------------------------------
Ran 20 tests in 0.000s

OK
$ python test_pyfuncs05.py
................................................
----------------------------------------------------------------------
Ran 48 tests in 0.001s

OK
$
Step 8: Submit your solution on Gradescope
Navigate to gradescope.com and login.
Your login id is your ____@ucsd.edu email address, with the full @ucsd.edu at the end.
You may have received an email to retrieve your password, or you might need to ask that the password reset email be resent.
Once you are logged in, locate the place to submit lab06. It should ask you to upload a .zip file with your submission.
Step 8b: Generate a .zip file for your submission
As long as you have pushed all of your changes to github.com, generating a .zip file for your submission is easy.
Just navigate to the page for your repo, use the “Clone or download” button, and then the “Download zip” button, as shown in the image below:
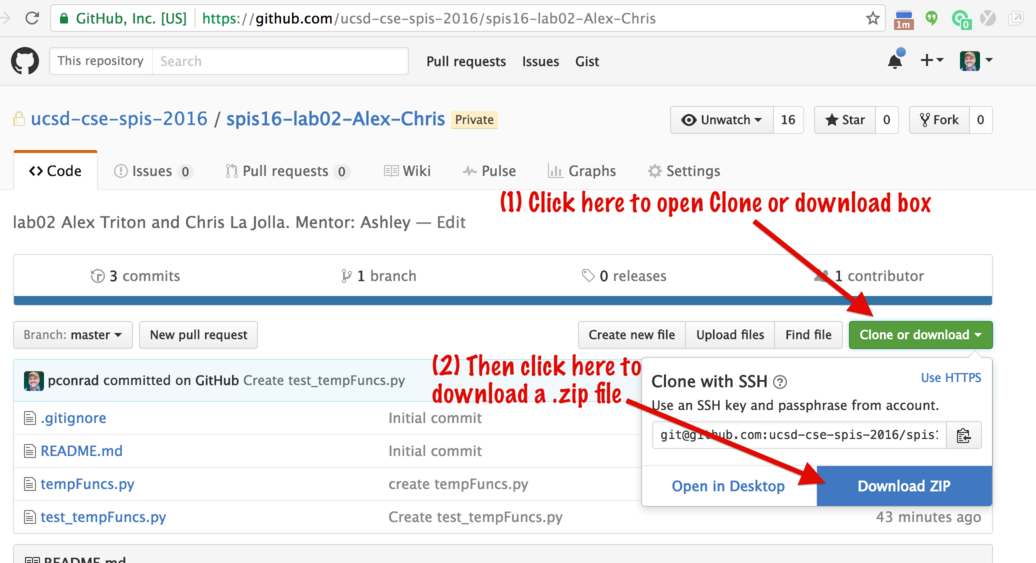
IMPORTANT: If your browser give you the option to: either (a) open the downloaded .zip file or (b) save it to disk, you need to select SAVE TO DISK.
If you open the downloaded .zip file, it may change the structure to one that the Gradescope autograder is not expecting.
The Gradescope autograder expects a .zip file with the name spis16-lab06-Name-Name-master.zip that contains the Python files that were in your starter code repo. If you change the names of functions, or of the files,
things may not work correctly.
Step 8c: Upload the zip, and wait for the results
Upload the zip and wait for the results: hopefully a perfect 100%.
And that’s it for lab06!